
Integral 2 manual — the Windows USB GUI, section by section
Chapter 5 of the online manual, covering pages 24–43 of the official PDF: every tab of the Integral 2 USB GUI for Windows. The GUI is compatible with all Microsoft Windows versions from Win XP to Win 10; install the right Silabs driver first. Download the original PDF or go back to the table of contents.
The top section (p.26)
The right boxed area provides: FW (current firmware version of your unit) and GUI (current Windows GUI version) in the top right corner; Source Info (information about the source device when available); RX0/RX1 (input signal resolution, refresh rate, color, bandwidth and HDCP information per input); AUD0/AUD1 (sound information per input); TX0/TX1 (status or output signal resolution, refresh rate, color, bandwidth, HDCP and EDID per output). On the left, below the Integral 2 logo, Active Input selects the current active input port or enters both Matrix modes, similar to the push button on the unit.


EDID MANAGER (p.27–28)
- [Automix Mode]: Create EDID based on mutual capabilities so both sinks will always show a picture and audio. Flags can be checked or unchecked to force and override parameters. Example: if your TV is stereo and your AVR full sound and both are connected, Automix will report Stereo by default; by checking the Full Audio flag you force Automix to always report Full Audio no matter the real sound capabilities of the connected sink devices.
- [Automix Algo]: Min Mixed Capabilities, Max Audio/Min Video, Top Output Priority, Bot Output Priority, Max Audio/Max Video (default).
- Flags: [2.0 Stereo], [5.1 Multi], [7.1 Full], [Native], [TOP MAX] (max audio capabilities from sink at top output), [HDR 10+], [HLG], [2020/xvYCC], [no YCbCr] (useful to force RGB), [no 3D], [DV Force Metadata], [DV Remove], [DV Limit 300MHz].
- [Custom Use / BT]: Pick an EDID from the preloaded banks; once you click one it is loaded and HPD events reset the signal to present your selected EDID automatically. Each input can have an individual EDID assigned.
- [Copy TOP Sink] / [Copy BOT Sink]: Use the EDID from the TOP or BOT sink.
- [Fixed EDID with L/R Audio]: 4K60 4:2:0 8b 300MHz stereo security table (except for FHD and 4K30 Max display).
- [Read RX EDID]: Read the currently active EDID, for example to double-check an Automix EDID with an external EDID editor.
- [Read TV [TOP] EDID] / [Read TV [BOT] EDID]: Sniff the EDID from the sink device connected to that output port; use it as the Custom EDID or export it with Save to File.
- [Load from File] / [Save to File] / [Upload EDID]: Open any EDID file, save the current EDID for backup or editing, and write the uploaded EDID file into the Integral 2 custom bank.

SCALER (p.29–30)
- [No Scaling]: the signal passes through untouched.
- [Custom Scaling]: manually define scaling parameters per output port — resolution, color space and deep color for both the upscale and downscale ports. Color space options: Follow Input (default), RGB FULL, RGB BT2020, 4:4:4 BT.709, 4:4:4 BT2020, 4:2:2 BT.709, 4:2:2 BT2020, 4:2:0 BT.709, 4:2:0 BT2020. Deep color options: Follow Input (default), 8-bit/24-bit, 10-bit/30-bit, 12-bit/36-bit, 16-bit/48-bit.
- [Auto Scaling]: automatic presets for TX1 [TOP output port]; by default the unit uses auto-sense. [4K60 PRESET] forces any 4K60 input out as 4K60 420 8bit 300MHz or 1080p60 444 8/10/12-bit — a neat profile for 300MHz displays with 4K60 420 8-bit support. [4K60 422 HDR PRESET] forces 4K60 420 HDR input out as 4K60 420 10-bit, 4K60 420 8-bit 300MHz or 1080p60 444 8/10/12-bit. [4K30 PRESET] forces any 4K24/25/30 out as 4K24/25/30 444 8-bit 300MHz, 1080p30 444 8/10/12-bit or 4K24/25/30 422 12-bit 300MHz. If EDID allows the player to send HDMI 2.0 formats such as all HDR modes, they will be accepted by the display due to Integral 2 scaling/chroma changes.
- [NO UPSCALING]: by default in Auto Scaling the Integral 2 upscales TX0 [BOT output port] when possible; check this option to disable that or to let the sink/display perform the upscaling.

HDR INFOFRAME (p.31–32)
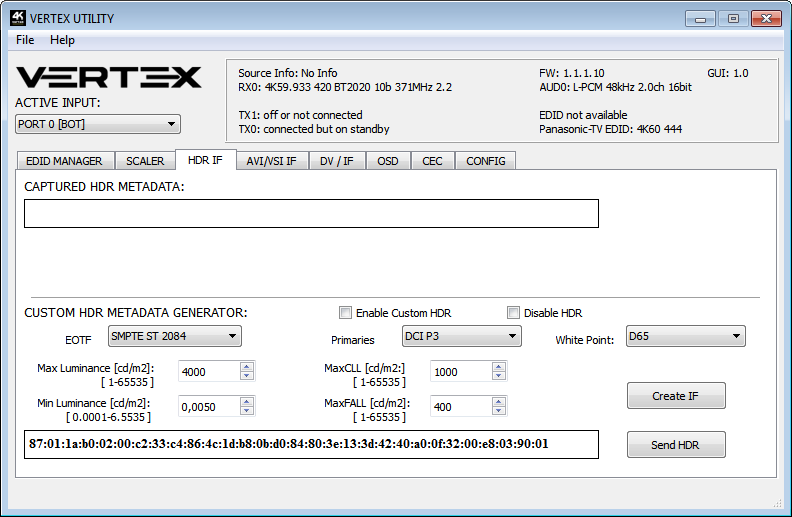
- [CAPTURED HDR METADATA]: if the source is sending HDR InfoFrame metadata it is captured, extracted and displayed — also deciphered in human-readable format on both the Windows GUI and OSD.
- [CUSTOM HDR METADATA GENERATOR]: create your own custom HDR metadata and inject it on the current signal, adding it or replacing the existing HDR metadata. Choose [EOTF] (SDR Luminance Range, HDR Luminance Range, HLG ITU-R BT.2100-0 or SMPTE ST 2084), [Primaries] (DCI P3, ITU-R BT 709-5 or ITU-R BT2020-2), [White Point], [Max Luminance], [Min Luminance], [MaxCLL] and [MaxFALL], then [Create IF] and [Send HDR].
- [ENABLE CUSTOM HDR]: once activated it turns ON the HDR mode of any HDR display and sends the custom HDR IF; the string is stored in the Integral 2 and is persistent over hotplugs and power cycles.
- [Disable HDR]: intercept and cancel all incoming HDR metadata — introduced to let JVC projector owners apply their own gamma curves for HDR content.
- To reset the strings: hold the RESET button 10 seconds on the unit, or apply reset from the GUI Config page (close and reopen the GUI afterwards).
AVI/VSI INFOFRAME (p.33–34)
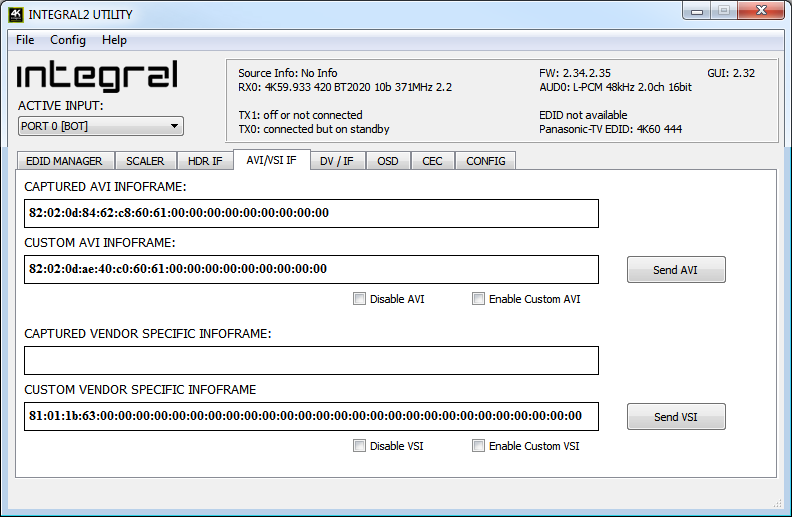
The Integral 2 captures and displays the incoming AVI InfoFrame and Vendor Specific InfoFrame (VSI), and can send a custom AVI or VSI string in HEX format ([Send AVI]/[Send VSI], [Enable Custom AVI]/[Enable Custom VSI]), or block them entirely ([Disable AVI]/[Disable VSI]). A custom string replaces the incoming one — this way you can for example activate BT2020 mode in the TV even though the content doesn't send the correct InfoFrame. Custom strings are saved in the Integral 2 and persistent over hotplugs and power cycles. The AVI mod is meant for advanced users only: incorrect values can blank the screen, and since settings are saved, even a power cycle won't help until reset. [Disable AVI] can be useful for some DVI displays or monitors that do not work well when receiving an AVI InfoFrame.
DV/IF — Dolby Vision and other infoframes (p.35)
[CAPTURED DOLBY VISION METADATA BLOCK]: the Integral 2 automatically sniffs, displays and saves any Dolby Vision mandatory string from a connected sink at BOT output. Once stored, this mandatory string can be used in Automix to ensure that the DV stream from the source is compatible with the sink. Once the DV string of a display is saved, you can insert other equipment like an AVR in between in the chain and still have the right DV signal passthru to the sink. The stream is fully deciphered in human-readable format. The tab also displays the captured SPD InfoFrame, Audio InfoFrame, HDMI Vendor Specific InfoFrame and HDMI Forum VSIF (the HDMI2.0 version of the HDMI VSIF).

OSD (p.36–37)
[OSD Enabled] switches the OSD feature on or off. [OSD LOCATION X, Y] sets the position at 1080p (values are multiplied by 2 when the stream is 4K). [OSD COLOR INDEX FG, BG, BG level] sets text colour, background colour and background transparency. [OSD INFO] selects the displayed fields: Source name, Video Field, Video IF, HDR TX/RX info, HDR IF, Audio field, RX Video info, RX HDR info. [OSD FADE] sets the timer before the OSD fades out (0 = never). [OSD Mask] with [MASK LOCATION x0,y0,x1,y1], [OSD Mask level 1–7] and [OSD grayscale 0–15] covers areas of the screen to reduce burn-in. [OSD CUSTOM TEXT] displays your own text at its own [LOCATION X,Y], with [NEVER FADE TEXT] to keep it visible after the OSD info fades. Click [SEND] to upload changes to the unit.

CEC COMMANDER (p.37–38)
- [CEC COMMAND]: enter a CEC command in HEX format and [Send CEC] to send it out. Examples supplied in the GUI: 5f:36 turn off [broadcast], 50:04 turn on [TV], 54:44:01 menu up [playback device 1], 58:44:02 menu down [playback device 2], 5b:44:40 toggle power [playback device 3].
- [INTEGRAL 2 CEC DEVICE TYPE]: Video Processor by default (ID#5) — the device type to choose if you have an AVR in your setup and want the AVR to own ARC or CEC. Audio System w/ARC is the device type if you want the Integral 2's ARC feature ON (sound from TV ARC to the Integral 2's 5.1 Optical Out or Jack Analog Stereo output), or to replace your AVR as CEC commander.
- [CEC ENABLED]: unchecked by default; once activated the Integral 2 answers and processes CEC requests and appears on the CEC network map. Unchecking removes the Integral 2 from the Root network map, but CEC commands for connected sinks or sources still pass thru.
- [ARC ALLOW DD+/ATMOS]: if your AVR can accept 192kHz audio via its optical input, the Integral 2 can extract DD+ and Atmos from TV-embedded streaming apps and forward it to your AVR via optical. Only a very few AVRs on the market support 192kHz via optical.
- Note: the CEC/ARC master is the BOT OUTPUT. For ARC from the TV, connect your TV's ARC-capable input to the Integral 2 BOT OUTPUT and set the unit as Audio System w/ARC. Any change to the enable state or device type requires a power cycle. Using the Android/iOS APP you can create custom menus for CEC commands.

MACROS — JVC projectors (p.39–40)
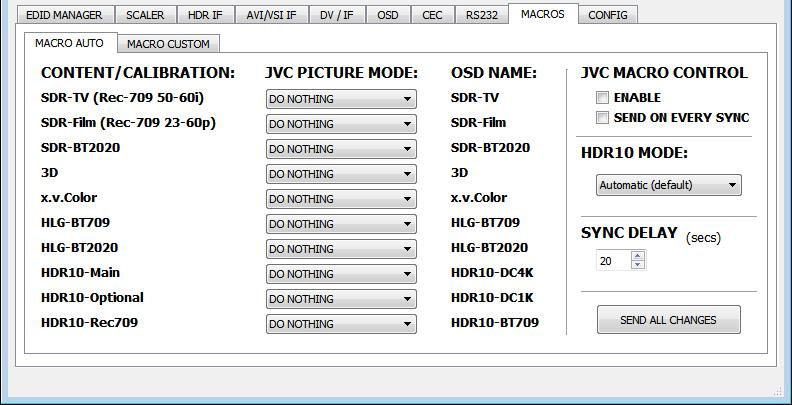
With the help of power users from the community, special automatic and custom macros have been developed for JVC projectors. The MACRO AUTO tab maps content/calibration types (SDR-TV, SDR-Film, SDR-BT2020, 3D, x.v.Color, HLG-BT709, HLG-BT2020, HDR10-Main, HDR10-Optional, HDR10-Rec709) to JVC picture modes, with JVC MACRO CONTROL enable, SEND ON EVERY SYNC, an HDR10 MODE selector and a SYNC DELAY. The MACRO CUSTOM tab builds IF/ELSE rules on HDR10 Max Brightness and MaxCLL values (the HDR10 custom / semi-automatic configuration page). The RS232 tab of the GUI also carries JVC control examples such as 21:89:01:49:50:36 [INPUT 1] and 21:89:01:50:4d:50:4d:30:43:0a [USER MODE 1].

CONFIG (p.41–43)
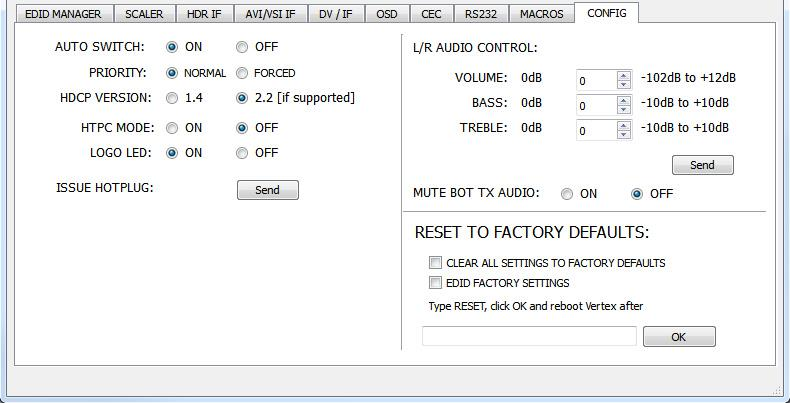
- [AUTO SWITCH]: when activated, forces the unit to automatically switch to the active signal if the selected signal is lost. [PRIORITY]: in FORCED input priority mode, as soon as a new active input is detected the Integral 2 switches to it.
- [HDCP VERSION]: select/force the HDCP revision of the output ports (1.4 or 2.2 [if supported]).
- [HTPC MODE]: useful if you have trouble with Windows display and icons when resuming from stand-by.
- [LOGO LED]: the green Integral 2 side logo can be turned ON/OFF at will.
- [ISSUE HOTPLUG]: performs a soft-reset in your setup.
- [L/R AUDIO CONTROL]: adjusts the Analog Stereo output — Volume (-102dB to +12dB), Bass and Treble (-10dB to +10dB).
- [MUTE BOT TX AUDIO]: if you use an AVR at TOP output you might want to disable sound going to equipment connected at BOT output.
- [CLEAR ALL SETTINGS TO FACTORY DEFAULTS] and [EDID FACTORY RESET]: check the box, type RESET in the text field and click OK; a power cycle is needed.
- [CONFIG] > [EXPORT] / [IMPORT]: save the current Integral 2 configuration and settings to a text file — to share for support reasons, or to load back after a firmware update. The exported file presents the active signal information, the EDID set for each RX and TX, and the list of parameters that can be edited directly in the text file before importing it back.

Next chapter
Continue with RS232 commands, IR codes and the app, or go back to the table of contents.