
Integral 2 manual — getting started and connections
Chapter 1 of the online manual, covering pages 4–7 and 18 of the official PDF: overview, connecting cables, the power/status LED, resets and the backside sticker. Download the original PDF (Rev 2.33) or go back to the table of contents.
Overview (p.4)
This unique HDMI2.0b and HDCP2.2 device supports true full 4K60 4:4:4 600MHz 18Gbps bandwidth signals. It will allow you to solve any HDCP error, Split or Matrix any SD/HD/FHD/UHD/HDR/DV or PC signals up to 600MHz, scale up or scale down between FHD and UHD on any channel individually, display relevant information on OSD, select between multiple EDID banks, inject Infoframe and more.
Control can be completed with IR codes, through slide switch or push buttons on the unit, via a wired USB connection to a Windows PC, via RS232 (Mac/Windows/Linux) or through a wireless Bluetooth connection with any smartphone or tablet running Android or iOS (GoBlue mandatory for iOS/Android APP support).

Connecting cables (p.5)
- Connect an HDMI input cable to the HDMI input.
- Connect an HDMI output cable to the HDMI output.
- Connect the Integral 2 power supply (5V / 2A, mini-USB).
- Connect any additional HDMI input/output cable, RS232 or any audio output cable (optional).
HDMI/HDCP 1.x devices at output must be connected to the TOP (Downscale) Output port. Make sure that you are using a 600MHz certified HDMI 4K cable if you plan to set up a 4K60 4:4:4 8b or 4K60 4:2:2 12b 600MHz 18Gbps link in your setup.

Power / status LED (p.6)
The Integral 2 Logo LED will shortly turn ON then OFF when power supply is applied. The Integral 2 Logo will glow green to indicate that the HDCP handshake has been completed. The status of the Logo may be used for troubleshooting:
| LOGO OFF | Insufficient power or no active input. Use the Integral 2 power supply; make sure the source is ON. Logo might also stay OFF based on INFO button conditions (see the INFO control chapter). |
|---|---|
| LOGO ON | The Integral 2 is powered and receiving and decoding a HDMI signal. |
Reset HPD (short press) or reset to factory default (long press) (p.7)
The 4K Integral 2 offers 2 functions per push button.
- [Short Press] on the Reset button generates a Hot Plug Detection event.
- [Long Press] (over 10s for security) resets the Integral 2 to factory default.
You can also reset the unit or perform any other control with IR codes, from the USB GUI for Windows PC, through RS232 for Mac/Windows/Linux or via the smartphone/tablet APP for Android and iOS.
Backside sticker (p.18)
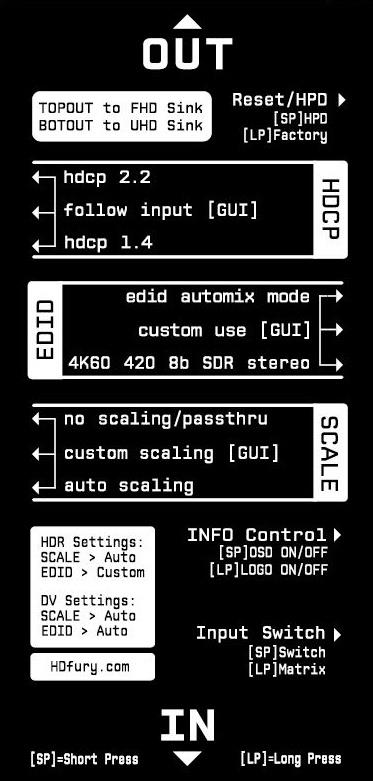
A sticker is available on the back of the unit to remind you of the basic configuration options available from the physical button and slide switches, as well as the Short Press [SP] and Long Press [LP] functions of each button. The sticker summarises: TOPOUT to FHD sink / BOTOUT to UHD sink; the HDCP switch positions (hdcp 2.2 / follow input [GUI] / hdcp 1.4); the EDID switch positions (edid automix mode / custom use [GUI] / 4K60 420 8b SDR stereo); the SCALE switch positions (no scaling/passthru / custom scaling [GUI] / auto scaling); INFO Control ([SP] OSD on/off, [LP] LOGO on/off) and Input Switch ([SP] switch, [LP] Matrix). Note: the INFO Control button behaviour was since updated — see the controls chapter.
Next chapter
Continue with buttons, slide switches and presets, or go back to the table of contents.